ROCK: Importing Music
ROCK makes it simple to add new music to your collection, no matter where it's stored. There are two primary methods for importing music, and both work seamlessly with internal, external, or network storage.
Before You Start
Important Notes:
- NAS: If you're using a NAS or other network storage, you can import your media by saving it directly to the NAS. For more information on setting up a NAS with Roon, see
- USB: For USB storage with ROCK, you can also copy music to your USB drive before connecting it to ROCK, rather than copying it over the network. Just ensure your drive is
Method #1: Drag and Drop onto the Roon application on Mac/PC
This is the simplest way to add music if you're using the Roon application on your Mac or PC.
Simply drag and drop your music files directly into the Roon application window. Roon will automatically copy these files to the storage locations you've configured on your Roon Server.
- If you've set up Roon to monitor multiple folders, it will prompt you to choose where you want to save the files. Roon will then copy them to a "Roon Imports" folder, organizing them by import time and the device they were imported from.
Want more control over your folder hierarchy, or do you have a lot of files? Proceed to Method 2.
Method #2: Importing To Network Folder
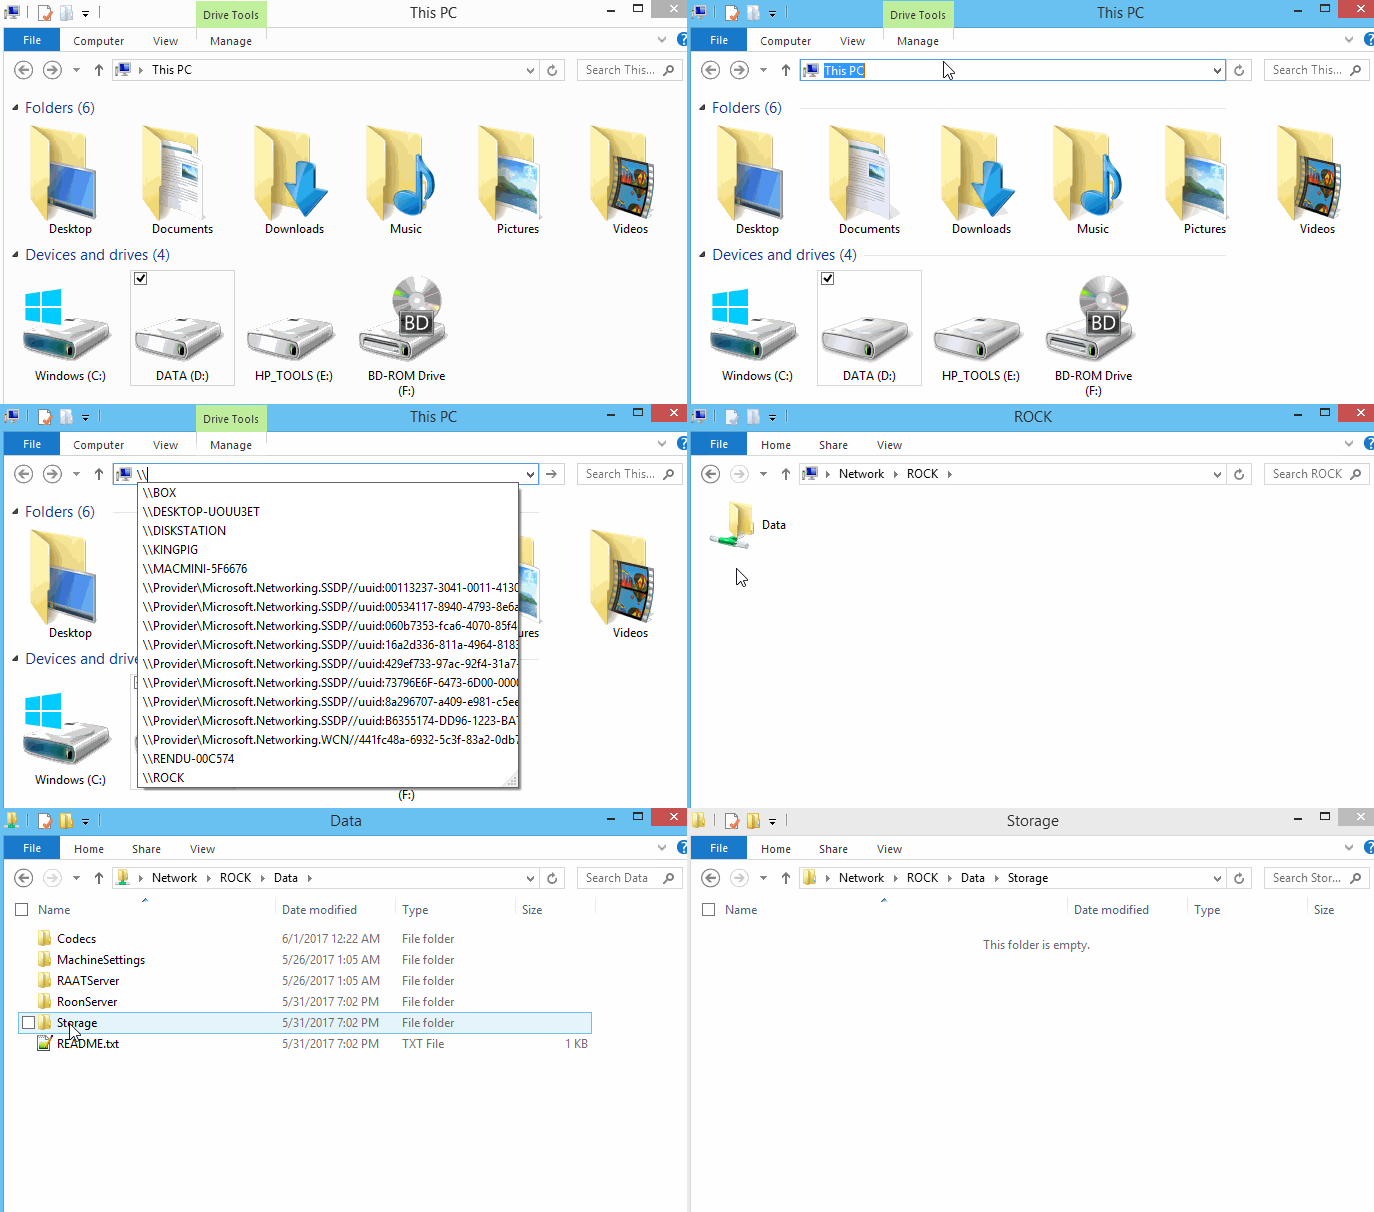
ROCK exposes a network share via SMB, similar to a Network Attached Storage (NAS) device. This allows you to directly copy files to ROCK over your network. Inside this share, you'll find a folder called Storage, which contains all your connected drives (USB or internal). Follow the steps below to import your library over the network:
Connecting to the Network Share
macOS
- Open Finder.
- Click the Go menu at the top.
- Select Connect To Server...
- In the "Connect To Server" window, type one of the following:
smb://rock/datasmb://rock.local/datasmb://192.168.0.100/data(Replace192.168.0.100with your ROCK's actual IP address if the others don't work.)
- When prompted, connect as a guest. You'll find your drives within the
Storagefolder.

Windows
- Open File Explorer.
- In the address bar, type one of the following:
\\rock\data\\rock.local\data\\192.168.0.100\data(Replace192.168.0.100with your ROCK's actual IP address if the others don't work.)
- When prompted for a username and password, enter
Guestfor both. You'll find your drives within theStoragefolder.

Troubleshooting Connection Issues (Windows)
Windows 10 (1709 – 22H2) and Windows 11 (up to 23H2)
-
Press Win + R, type
gpedit.msc, and press Enter. -
In the Local Group Policy Editor, navigate to:
Computer Configuration > Administrative Templates > Network > SMB Client -
Locate Allow insecure guest logons.
-
Double-click the setting → set it to Enabled → click OK.
Disable the SMB client signing requirement
-
Navigate to:
Computer Configuration > Windows Settings > Security Settings > Local Policies > Security Options -
Locate Microsoft network client: Digitally sign communications (always).
-
Double-click → set to Disabled → click OK.
Windows 11 (24H2 and later)
-
Press Win + R, type
gpedit.msc, and press Enter. -
In the Local Group Policy Editor, navigate to:
Computer Configuration > Administrative Templates > Network > Lanman Workstation -
Locate Enable insecure guest logons.
-
Double-click → set to Enabled → click OK.
Disable the SMB client signing requirement
-
Navigate to:
Computer Configuration > Windows Settings > Security Settings > Local Policies > Security Options -
Locate Microsoft network client: Digitally sign communications (always).
-
Double-click → set to Disabled → click OK.
Windows Home (using PowerShell)
The Group Policy Editor is not available on Windows Home editions. The required settings must be applied using PowerShell.
-
Press Start, type PowerShell.
-
Right-click Windows PowerShell and select Run as administrator.
-
Accept the UAC prompt.
Enable insecure guest logons
Run:
reg add "HKLM\SOFTWARE\Policies\Microsoft\Windows\LanmanWorkstation" /v AllowInsecureGuestAuth /t REG_DWORD /d 1 /fDisable the SMB client signing requirement
Run:
reg add "HKLM\SYSTEM\CurrentControlSet\Services\LanmanWorkstation\Parameters" /v RequireSecuritySignature /t REG_DWORD /d 0 /f-
Restart the computer to apply the changes
-
Related Articles
Roon OS Data Directory
Roon OS automatically exposes a shared network folder (SMB share) called `/Data`. Be careful modifying files or folders in this directory, as this could lead to permanent data corruption and/or loss. Some reasons you might want to access the shared ...Import Settings
Overview Roon's Import Settings provide control over how Roon handles your music files. When you modify import settings, Roon re-evaluates each file in your library taking the new settings into account. This approach allows for the settings to be ...Migrating To ROCK
If you're setting up ROCK, and your Roon Server had previously been running on Mac, Windows, or Linux, you'll need to migrate your Roon database. Your database includes your playlists, edits, play history, tags, settings, and more. This guide will ...ROCK: Storage Basics
ROCK offers a few different options for storing your music, each with advantages and disadvantages. Whatever storage configuration you're using with ROCK, you'll want to read this article about importing your music into Roon. If you are using ...FAQ: Roon is importing my collection, but it seems to be stuck or spinning forever - how do I fix this?
Sometimes, Roon's file scanner can encounter file tags formatted in ways we're not expecting, and sometimes we hit a file that's simply corrupt. Usually we're able to either import these files anyway, but if the file appears unreadable we will skip ...