FAQ: Setting Up Roon on MacOS
Roon is a powerful music management and playback platform that works beautifully on macOS. There are a few important things to know before you dive in and this guide will do just that: it will walk you through the essentials for setting up Roon on your Mac.
What to Know First
Roon's Architecture
- Server: The “brain” of Roon, where your music library lives and all the heavy lifting happens. This is your Roon Server.
- Control: The interface you use to browse and play music (Roon app on your Mac, iPad, or phone).
- Output: Where the music plays (your Mac speakers, DAC, or network streamers).

Minimum macOS Requirements
- macOS Version: Roon requires macOS 12 or later.
- Hardware: At least 4GB RAM, but 8GB or more is strongly recommended for large libraries or DSP use.
- Processor: Intel Core i3 or better (Apple Silicon works great via native or Rosetta 2).
 For large libraries (100k+ tracks), consider a faster SSD and more RAM.
Downloading and Installing Roon
- Save the Roon.dmg file to your downloads folder.
- Once downloaded, open the Roon.dmg file and drag it to your Applications folder.
- Open Roon (macOS will likely ask to confirm since it’s downloaded from the internet).
Roon Server Setup
First Launch
- When you launch Roon for the first time, it will automatically find and list all available Roon Servers.
- For most macOS users, select “This Mac” as your server, and press Connect
- Sign in with your Roon account or start your trial.
Having trouble getting Roon Server to launch? Head to the bottom of this page for the first steps in troubleshooting.
Adding Music to Roon via macOS
Roon gives you three different ways to add music, and you’re free to use any or all of them together:
- When you log in to Roon for the first time, you will be asked if you want to add your local files. You can add them at this stage or press "Continue" at the bottom of the page and add them later by going to Roon Settings -> Storage -> +Add folder.
- Point Roon to your music folders (e.g., Music folder or external drive)
- Make sure the Mac has read/write access to that library location.
- This is also where you can connect to a network share. Click here to learn all about setting up network shares via macOS.
- Streaming Services:
- When you log in to Roon for the first time, you will be asked if you want to add a music service. You can connect to nugs, Tidal, Qobuz, or KKBOX by logging in to your existing account or starting a free trial with any of those services. Or you can press "No thanks" at the bottom of the page and connect to those services later by going to Roon Settings -> Services.
- Live Radio: access the 'Live Radio' tab on the left-hand navigation bar and explore all the live radio options within Roon.
Audio Device Setup
- Roon automatically scans your system for all available audio outputs:
- Mac built-in audio (speakers, headphone jack).
- USB DACs (Digital-to-Analog Converters you’ve connected).
- Networked devices (Roon Ready endpoints, AirPlay, Chromecast, Sonos, etc.).
- You’ll find these listed under Settings > Audio. Learn more about Roon Zones here.
Enabling Audio Devices
- During the first setup, you will be asked to set up your Audio devices. If you want to set them up later, simply press Finish at the bottom of the page, and later on, you can enable them from Roon Settings -> Audio
- By default, detected devices are shown as “Available” but not enabled.
- To use one, click Enable, give it a friendly name (e.g., below shows "Mike's Mac"), and it will show up as a playback zone
Managing Volume Control
To access your volume control settings, click the volume icon > settings cogwheel > device setup
Once in Device setup, you can review the following Volume control options:
- Device Volume: Controls volume at the DAC level (if supported).
- Fixed Volume: Best for external preamps or amps. Roon sends audio at full resolution, no digital volume applied.
- DSP Volume: Let's Roon handle volume digitally in the software, useful when device volume isn’t supported.
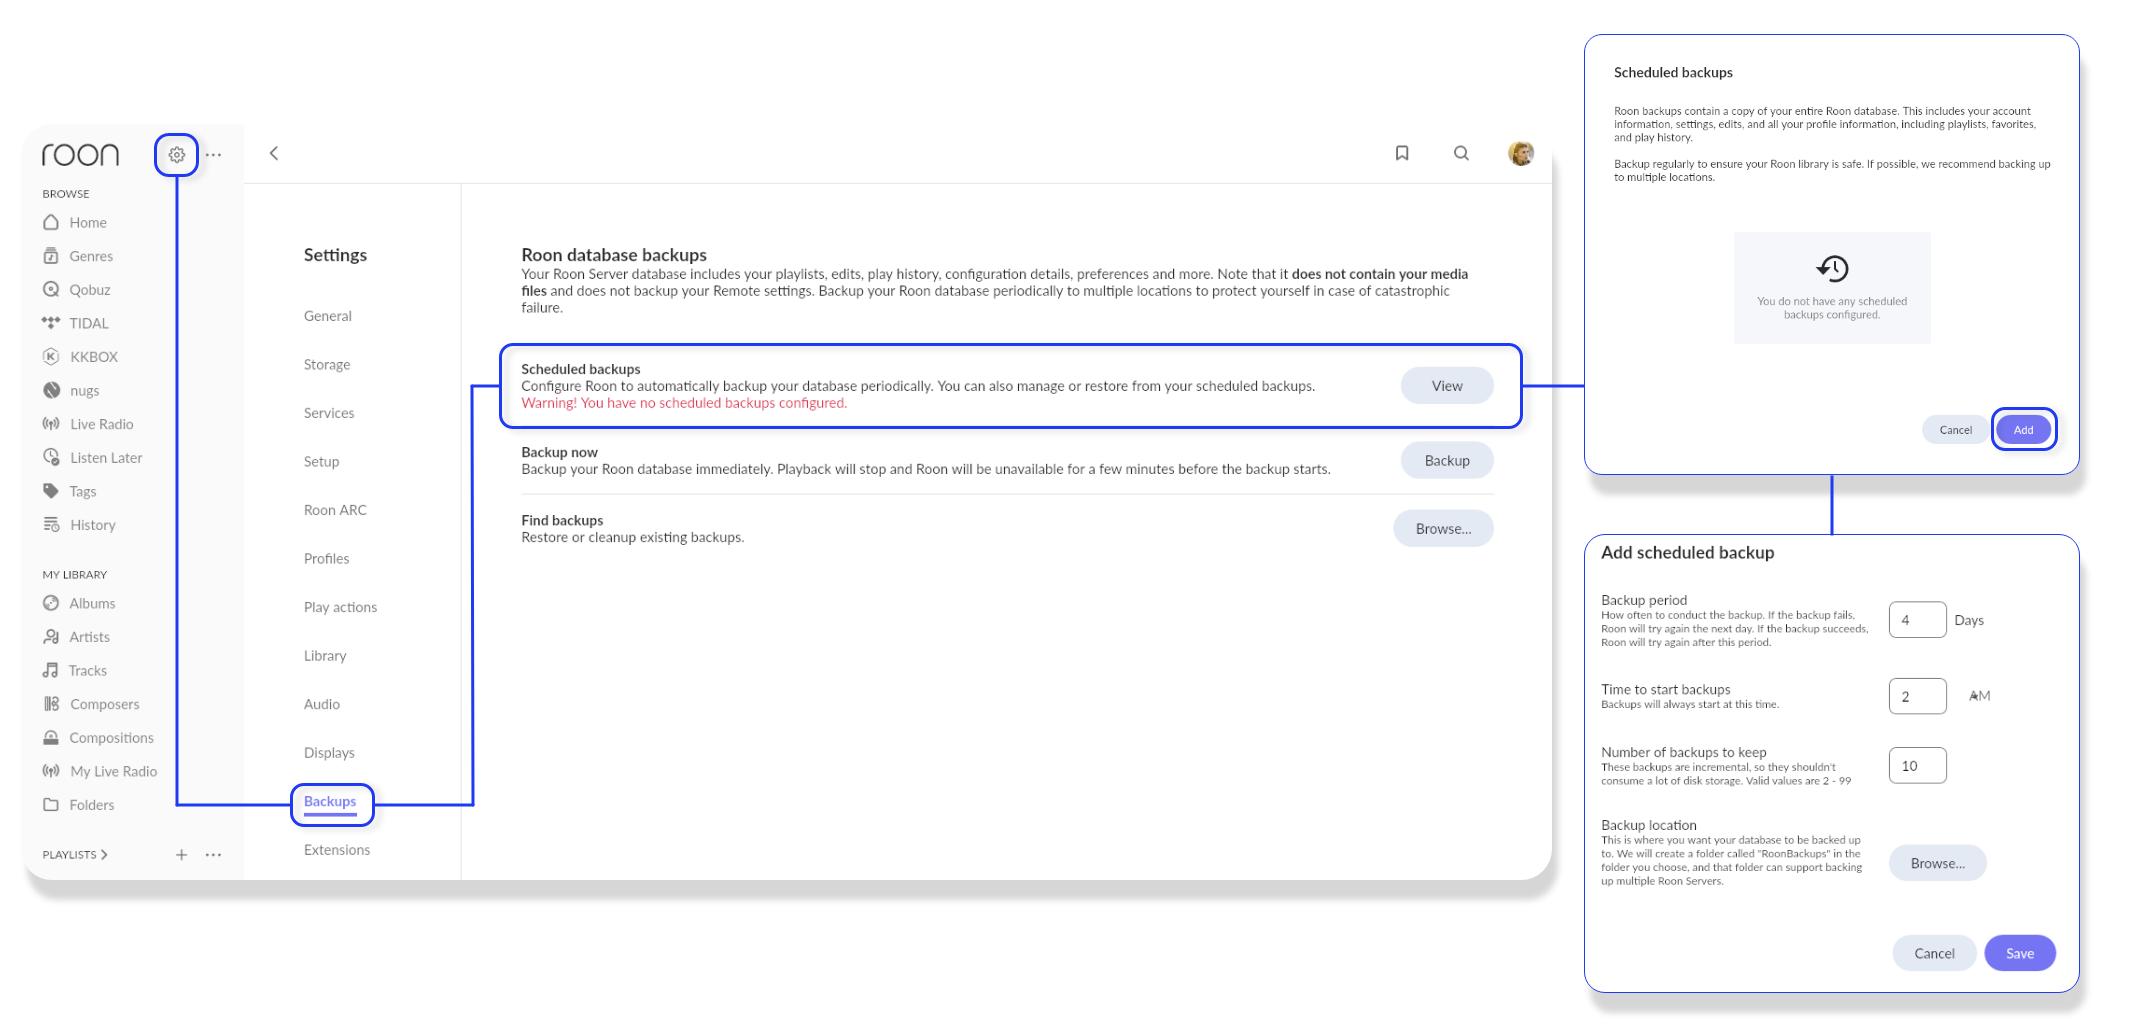
Setting Up Backups with macOS
- Roon’s database stores your playlists, edits, and preferences. The more changes you make to further customize your Roon experience, the more you'll want to save a backup in case something goes wrong.
- Go to Settings -> Backups -> View ->and schedule automatic backups to an external drive or local network/cloud location. Click here to learn more about Backups.Never save a backup on the same drive that hosts your Roon Server. In the case of using your Mac as a Roon Server, it's best to save your backups to a separate drive location, like an external USB drive or local shared network drive.
 Troubleshooting Basics
If Roon can’t see your DAC
If endpoints aren’t showing
For streaming login issues
I can’t open Roon Server on my Mac
- Nothing happens when you double-click the app.
- You get a pop-up saying Roon “can’t be opened because it is from an unidentified developer."
Fix:
- Go to System Settings → Privacy & Security.
- Scroll down, you’ll often see a message like “RoonServer was blocked because it is not from an identified developer” with an Allow Anyway button. Click it, then try reopening.
- If that doesn’t appear:
- Head to your applications folder and find Roon → Right-click (or Control-click) →Show Package Contents → RoonServer → Right-click (or Control-click) → Open → click Open again in the warning dialog. This should both open Roon Server and whitelist it.
Firewall Blocking
If macOS Firewall is on, it may block Roon’s inbound connections at startup, preventing it from launching fully.
Fix:
Go to System Settings → Network → Firewall → Options…
Add RoonServer and RAATServer and set them to Allow incoming connections.
Full Disk Access
Roon needs access to your Music folder, external drives, and its own database location under ~/Library. If macOS blocks this, Roon Server may fail silently.
Fix:
Open System Settings → Privacy & Security → Full Disk Access.
Unlock with your masOS password/Touch ID.
Make sure RoonServer is checked. If not, add them manually by clicking + and selecting the app from Applications.
Roon doesn’t recognize my local music folders
- First, run through the steps outlined here: Adding a Local Folder to your Roon Library
- If the folder doesn’t appear:
- Go to System Settings → Privacy & Security → Full Disk Access.
- Ensure Roon (or RoonServer) is checked.
- Restart Roon.
- Check to ensure you're using supported audio formats - learn more here.
Still having issues? Let’s review the macOS folder share settings.
Related Articles
Installing Roon
Operating Systems covered in this article: macOS Windows Linux iOS and Android Minimum Requirements See the FAQ: What are the minimum requirements for more information about the hardware and software platforms supported by Roon. Installing Roon on ...FAQ: What's the best way to configure my NAS for Roon?
If your media storage or backup location isn't directly connected to your server machine, you'll need to add that location over the network. Whether you're using a NAS, Windows, or Mac machine for storage, adding these locations is easy as long as ...FAQ: How do I create a shared folder on Mac and add it as a watched folder in Roon?
Before Roon will be able to access your music library that's stored on your Mac OS device, you'll need to first ensure that the folder is properly shared. Once the folder has the proper share settings applied, it can be added as a watched folder in ...Audio On macOS
Overview Roon supports two output mechanisms on Mac OS X: CoreAudio and *ASIO*. CoreAudio is Apple's native audio framework. ASIO support on Mac is extremely limited--currently the only devices we are aware of are manufactured by exaSound. If you ...Roon Hardware Specification Recommendations
Roon will run on just about any recent PC or Mac. Performance and quality of experience will depend on the size of your music collection and the performance of your hardware. Check out this comment on our community site for the nitty gritty details. ...